Every wannabe developer has, at some point, come across the advice to read the source code instead of relying on documentation. However reading huge unknown source codes is very different from reading your own code. You can’t read it all in one go, start to finish; like you would for your own code. Instead its more like diving into the code and following a trail of function calls to the full depth of the library. It forces you to be comfortable with not knowing how the whole thing works together but forces you to know enough to be able to debug your problems.
I first stumbled upon this advice while I was in 11th grade. It was CodingHorror’s article Learn to Read the Source, Luke. The 11th grade me however didn’t act on this advice and continued to use all sorts of shortcuts. I don’t blame the 11th grade me. He didn’t even understand what anonymous classes were; just memorized the weird code for setOnClickListener which he had mindlessly copy pasted from StackOverflow.
Fast forward two years, now in first year of college, I was going through the oldest programming wiki on the internet, reading http://wiki.c2.com/?UseTheSourceLuke. Although the freshman me was compelled by the article he too forgot to enforce it while programming. Somehow the freshman me had developed a notion that all bugs are in his code only. The idea that he would ever encounter a bug in the Android SDK or library he was using seemed implausible!
The eye opener came another year later when I was a sophomore in college. Through some luck, I found myself pair programming with the best hacker in IIT Kanpur. HackMaestro, the real deal you see in movies like Die Hard and Kung Furry. We encountered a strange bug, a new api in the support library wasn’t working as described by the documentation. My naive strategy to fix this was to read, re-read the documentation, keeping googling, reading StackOverflow and try every permutation of the function parameters until I find a solution. Then if all else fail I would simple switch to a different library. This is what avoiding reading the source code for four years does to you! Don’t be that guy! Thankfully we didn’t follow my strategy, we went straight to the function source code. The bug was right there, staring at my face. No way I would have missed it even if I was working alone. But alone I would never have had the courage to even go the the function’s source code.
I came to the realization that I wasn’t the 11th grade me anymore. I did understand what anonymous classes were, just like most of the Java language concepts. I knew the language well enough to clone any Java project and get a sense of what’s going on. The only problem was that I was still stuck in an old mindset. Now, in my senior year, I can tell you that I have learned a lot more in my last two years since I have fearlessly dived into unknown source codes.
In this article I will take you through my process of diving into unknown source code. I will look under the hood of Butterknife, an awesome library to get ride of boilerplate findViewById code. What exactly happens when ButterKnife.bind() is called? Lets create a small sample project using ButterKnife and try to reverse engineer what ButterKnife is doing. Clone the sample project and switch to lib/butterknife branch:
# git clone https://github.com/ShikherVerma/ReverseEngineerAndroidLibraries.git ~/AndroidStudioProjects/SampleApplication
# cd ~/AndroidStudioProjects/SampleApplication
# git checkout lib/butterknife
The sample application that you just cloned in a minimal example of using ButterKnife. Its activity_main.xml contains a Button and a TextView. Pressing the button shows the current time (epoch time) in the text view.
I have added Butterknife to gradle dependencies :
compile 'com.jakewharton:butterknife:8.8.1'
annotationProcessor 'com.jakewharton:butterknife-compiler:8.8.1'
The MainActivity.java is :
import butterknife.BindView;
import butterknife.ButterKnife;
import butterknife.OnClick;

public class MainActivity extends Activity {

    @BindView(R.id.text)
    TextView text;

    @Override
    protected void onCreate(Bundle savedInstanceState) {
        super.onCreate(savedInstanceState);
        setContentView(R.layout.activity_main);
        ButterKnife.bind(this);
    }

    @OnClick(R.id.button)
    public void onButtonClick(View v) {
        text.setText("Epoch :" + System.currentTimeMillis()/1000);
    }
}
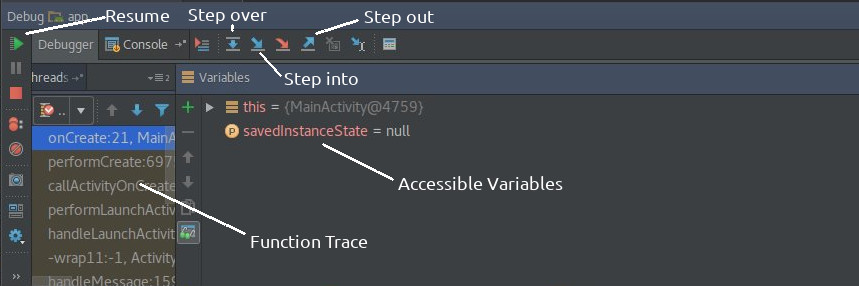
Set a break point at ButterKnife.bind(this); and launch the app with Debug Run (shortcut Shift+F9). The control flow will hit your breakpoint as soon as the app is launched.

Lets investigate what is happening here. Press the step into button (the blue arrow pointing to lower right). ButterKnife.java file will open up.
The execution will be at the initialization of a static variable debug. Its not clear what this variable is but lets proceed.

Press the step over button (left of step into button) since stepping into the initialization is meaningless.
Next we hit the initialization of a LinkedHashMap of Class to Constructors, called BINDINGS.

Again we don’t yet know what this is being used for. Press the step over button. Execution goes to the source code of bind function :

Use Ctrl+Q to read documentation for a function after pointing caret (keyboard blinky thing) at the function name. Or you can use Ctrl+LeftClick to jump to source code. If you read the documentation for getWindow and getDecorView its pretty clear that sourceView is the root view of the target activity. Press the step over button to go to the return line. We don’t know what createBinding is doing. All we can guess is that it is returning a Unbinder object since our current bind function is supposed to return that. Step into the createBinding function using the step into button. This is the source for the createBinding function :
private static Unbinder createBinding(@NonNull Object target, @NonNull View source) {
  Class<?> targetClass = target.getClass();
  if (debug) Log.d(TAG, "Looking up binding for " + targetClass.getName());
  Constructor<? extends Unbinder> constructor = findBindingConstructorForClass(targetClass);
  ...
The current statement is obviously storing the target class information in targetClass. Step over. Remember we initialized a static debug variable? We discover now that it controls when Log statements are run. This trick is quite useful. Instead of removing all Log statements before publishing your app. You could just wrap all the log statements in an if(debug) and set the debug to false before publishing! This is another side effect of reading the source code. We uncover interesting design patterns and useful coding conventions. Step over to next line. We encounter a new function findBindingConstructorForClass. Step into this function.
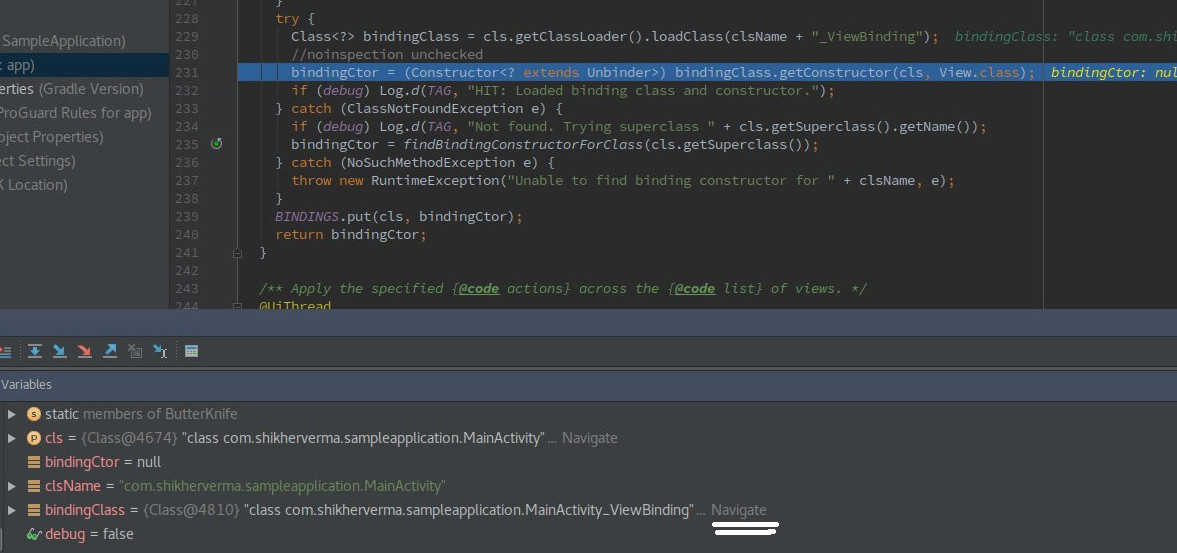
private static Constructor<? extends Unbinder> findBindingConstructorForClass(Class<?> cls) {
  Constructor<? extends Unbinder> bindingCtor = BINDINGS.get(cls);
  if (bindingCtor != null) {
    if (debug) Log.d(TAG, "HIT: Cached in binding map.");
    return bindingCtor;
  }
  String clsName = cls.getName();
  if (clsName.startsWith("android.") || clsName.startsWith("java.")) {
    if (debug) Log.d(TAG, "MISS: Reached framework class. Abandoning search.");
    return null;
  }
  try {
    Class<?> bindingClass = cls.getClassLoader().loadClass(clsName + "_ViewBinding");
    //noinspection unchecked
    bindingCtor = (Constructor<? extends Unbinder>) bindingClass.getConstructor(cls, View.class);
    if (debug) Log.d(TAG, "HIT: Loaded binding class and constructor.");
  } catch (ClassNotFoundException e) {
    if (debug) Log.d(TAG, "Not found. Trying superclass " + cls.getSuperclass().getName());
    bindingCtor = findBindingConstructorForClass(cls.getSuperclass());
  } catch (NoSuchMethodException e) {
    throw new RuntimeException("Unable to find binding constructor for " + clsName, e);
  }
  BINDINGS.put(cls, bindingCtor);
  return bindingCtor;
}
Lets read this function and try to understand what is happening. In first line, we called get(cls) function from the BINDINGS map that we created earlier. Next, the if block logs HIT... if the last statement returned something. Stepped over to next line. Aha! so the BINDINGS map is a cache. Since this is the first time this function is called, the cache was empty. Next it returns null if the class name starts with android. or java.. Hmm, weird. Why would the class name include these package names. Anyways stepping over. It tries to initialize a new bindingClass with our current class name + _ViewBinding. I don’t remember creating any MainActivity_ViewBinding class. But on stepping over the variables tab of debugger shows me that it found a class by that name! We can click the Navigate grey text next to the variable to go to the source of that class.
Stepping over until this function is finished causes the constructor of this class to be cached in BINDINGS and returned. Even though the catch block was never hit, it reveals some interesting information. If the class wasn’t found, this function calls itself with the super class of the current class with which this function was called. So effectively this is a recursive function which goes higher up in hierarchy until it finds a binding class. That’s why we had the check of classes who are in android. or java. package. That was the base case of this recursive function. No idea why this was done, maybe different android versions or some phone manufacturers modified the default android behavior so this hack had to be used. This is another good side effect of reading the source code. “Sometimes, the documentation isn’t complete. Sometimes, it’s wrong. The source code never lies” - codinghorror.
The execution is back at createBinding. Stepping over. It checks that the returned constructor wasn’t null and then invokes the constructor to return a new instance. Since this function has to return an instance of Unbinder we can guess that the new instance will be a subclass of Unbinder. Lets step in. This takes us to the constructor of the mysterious MainActivity_ViewBinding class :
package com.shikherverma.sampleapplication;

import android.support.annotation.CallSuper;
import android.support.annotation.UiThread;
import android.view.View;
import android.widget.TextView;
import butterknife.Unbinder;
import butterknife.internal.DebouncingOnClickListener;
import butterknife.internal.Utils;
import java.lang.IllegalStateException;
import java.lang.Override;

public class MainActivity_ViewBinding implements Unbinder {
  private MainActivity target;
  private View view2131165193;

  @UiThread
  public MainActivity_ViewBinding(MainActivity target) {
    this(target, target.getWindow().getDecorView());
  }

  @UiThread
  public MainActivity_ViewBinding(final MainActivity target, View source) {
    this.target = target;
    View view;
    target.text = Utils.findRequiredViewAsType(source, R.id.text, "field 'text'", TextView.class);
    view = Utils.findRequiredView(source, R.id.button, "method 'onButtonClick'");
    view2131165193 = view;
    view.setOnClickListener(new DebouncingOnClickListener() {
      @Override
      public void doClick(View p0) {
        target.onButtonClick(p0);
      }
    });
  }

  @Override
  @CallSuper
  public void unbind() {
    MainActivity target = this.target;
    if (target == null) throw new IllegalStateException("Bindings already cleared.");
    this.target = null;
    target.text = null;
    view2131165193.setOnClickListener(null);
    view2131165193 = null;
  }
}
Its unlikely that this class was a part of the ButterKnife library since I can easily change the name MainActivity to something else. And all the class does is assign an object to the text and set an onCLickListener on R.id.button to call our onButtonClick. Most probably this was generated by ButterKnife somehow. If you RightClick on the file tab you can Copy Path and see where this file is located. For me it comes out as :
SampleApplication/app/build/generated/source/apt/debug/com/shikherverma/sampleapplication/MainActivity_ViewBinding.java
So our guess was right. This is a generated class, whose source code is present in app/build/generated/sources/apt/. We will come back to this later. Lets finish our debug break point work. Step over until you are out of this class and back in createBinding. Stepping over takes you back to the original bind function that we called and stepping over yet again brings you back to your MainActivity. You can click Resume Program button now and interact with the live app. After finding out what the current epoch time is via the running app, lets get back to analyzing what this MainActivity_ViewBinding.java is and how it was created. All we know at this point is that this class extends Unbinder, is auto generated by ButterKnife and is in the app/build/generated/sources/apt/ folder. The app/build/generated/sources folder contains 5 folders; aidl, apt, buildConfig, r, rs. I utilized my google ninja skills and search android generated source <fill name here> folder for each of these folders. The aidl is for Android Interface Definition Language, it is some sort of android interprocess communication. The r folder contains R.java file, which is the bridge between Java land and xml land. buildConfig contains info about the build variants. No idea what rs is for. If any of you know, please enlighten me in the comments! apt stands for Annotations Processing Tool. What is an annotation ? @Override is an annotation! Anyone who has doing android programming has used it, regardless of whether they knew what it was. It turns out java has an option to add custom annotations, which is how Butterknife provides @BindView and @OnClick annotations. Lets jump to the source code of these custom annotations and try to understand them. Use Ctrl+LeftClick to jump to source code. This is the source code of @BindView:
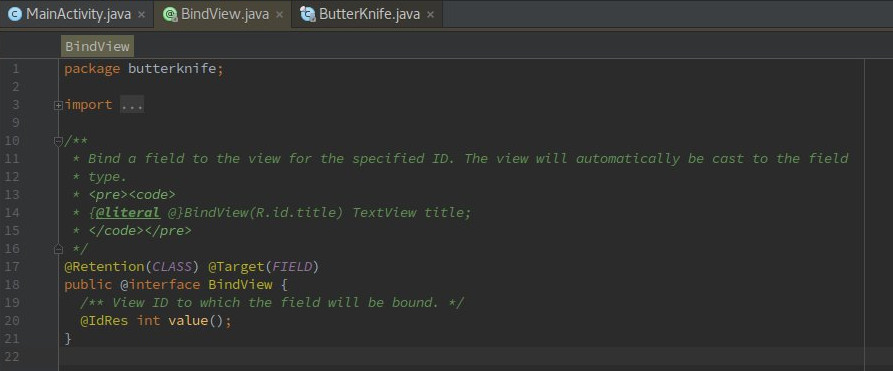
A little bit of googling reveals that :
@interface tells java compiler that this is a custom annotation.
@Target tells what this annotation is supposed to annotate. FIELD means it can only be used to annotate variables. Not functions or classes. But why stop here. Jump to the source of this FIELD variable. It turns out this FIELD variable is a enum. You can see other things that an annotation can annotate by reading the other values of this enum.
@Retention tells how the annotation is stored. You can jump to the source code to checkout other options.
Hmm, this still doesn’t tell us how this annotation is used to generate the ViewBinding class.
We have analysed everything Butterknife related in the MainActivity. Lets go back to the gradle dependencies we added.
compile 'com.jakewharton:butterknife:8.8.1'
annotationProcessor 'com.jakewharton:butterknife-compiler:8.8.1'
What exactly are these lines doing? Whats the difference between compile and annotationProcessor? Jumping to the source code of both compile and annotationProcessor takes us into gradle source code file gradle-3.3/src/core/org/gradle/api/artifacts/dsl/DependencyHandler.java, function add():
    /**
     * Adds a dependency to the given configuration.
     *
     * @param configurationName The name of the configuration.
     * @param dependencyNotation
     *
     * The dependency notation, in one of the notations described above.
     * @return The dependency.
     */
    Dependency add(String configurationName, Object dependencyNotation);
So compile and annotationProcessor are different configurations. compile tells gradle that the compilation process depends on a dependency. annotationProcessor tells gradle that the project uses annotation which this annotationProcessor can process. To learn about what gradle dependency configurations are you can read the gradle source code documentation.
Now we know that com.jakewharton:butterknife-compiler:8.8.1 is responsible for processing the annotations. Gradle downloads the dependencies to /home/$USER/.gradle/ directory. Using find . -type d -name butterknife-compiler find that the library is downloaded to .gradle/caches/modules-2/files-2.1/com.jakewharton/butterknife-compiler/8.8.1/b2f4505a1babb7b7c11abbbf8ea4c90b18c3aeac/butterknife-compiler-8.8.1.jar. But this is the compiled jar not the source code. The source code is available at https://github.com/JakeWharton/butterknife/tree/master/butterknife-compiler
Lets read the whole source code top to bottom since we are unable to set break points and step through the code while it is running.
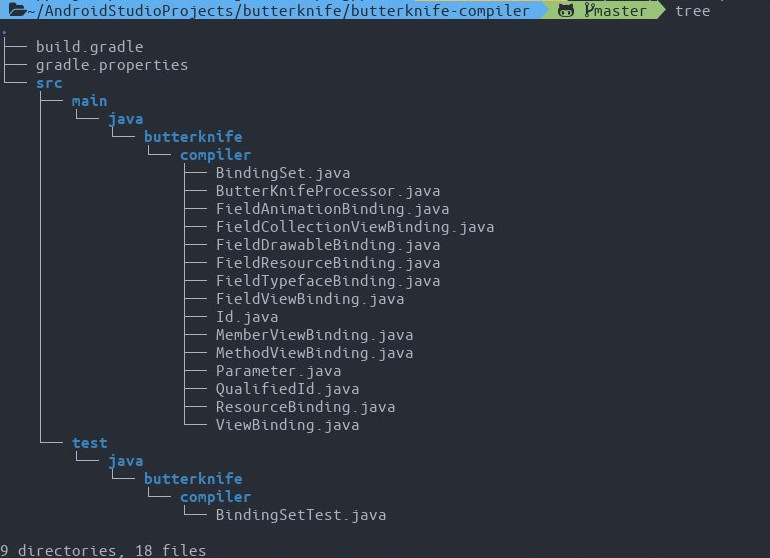
The build.gradle and gradle.properties are the gradle files for this project and src/test directory is for java unit testing code. The src/main is the directory we are interested in. After reading a bit about annotation processor (read http://hannesdorfmann.com/annotation-processing/annotationprocessing101) I discover that every annotation processor class extends AbstractProcessor and is annotated with @AutoService(Processor.class). Let search which class extends from AbstractProcessor.

The class ButterKnifeProcessor is the one which analyses the annotations. process() function of the AbstactProcessor is supposed to process the file. Lets read the process() funtion in ButterKnifeProcessor to find out how it is generating the file.
@Override public boolean process(Set<? extends TypeElement> elements, RoundEnvironment env) {
  Map<TypeElement, BindingSet> bindingMap = findAndParseTargets(env);
...
The first line calls findAndParseTargets which as the name suggests should return all the annotated targets that ButterKnife has to process. Lets go to the source code of findAndParseTargets:
  private Map<TypeElement, BindingSet> findAndParseTargets(RoundEnvironment env) {
    Map<TypeElement, BindingSet.Builder> builderMap = new LinkedHashMap<>();
    ...
    // Process each @BindAnim element.
    for...
    ...
    // Process each @BindString element.
    for...
    // Process each @BindView element.
    for (Element element : env.getElementsAnnotatedWith(BindView.class)) {
      try {
        parseBindView(element, builderMap, erasedTargetNames);
      } catch (Exception e) {
        logParsingError(element, BindView.class, e);
      }
    }
    // Process each @BindViews element.
    ...
    return bindingMap;
  }
This function does exactly as expected. It loops through the all the annotated targets and generated binding for them. As shown in case of @BindView above. This function then returns a map of target element to generated binding. Then back in process() :
Map<TypeElement, BindingSet> bindingMap = findAndParseTargets(env);
for (Map.Entry<TypeElement, BindingSet> entry : bindingMap.entrySet()) {
  TypeElement typeElement = entry.getKey();
  BindingSet binding = entry.getValue();
  JavaFile javaFile = binding.brewJava(sdk, debuggable);
  javaFile.writeTo(filer);
}
For each generated binding, it calls binding.brewJava and writes it to JavaFile javaFile. Jump to the source code of JavaFile. Its provided by a library called JavaPoet . A library for generating java files. Nice name :) Finally it dumps it to disk by calling javaFile.writeTo().
That concludes our ButterKnife source code diving! Hopefully this would motivate you to read the source code of the libraries you are using and stop treating them as black boxes. If you are interested in getting better at source code diving see : http://wiki.c2.com/?TipsForReadingCode. You can use this new knowledge of annotations and code generation to remove boilerplate code from your apps by writing your own libraries. See https://blog.realm.io/360andev-ryan-harter-eliminate-boilerplate/.